Shenzhen Zhichong Electronic Technology Co. , Ltd.
AF-9211Auto focus machine
-User Manual-
AF-9211Auto focus machine
-User Manual-
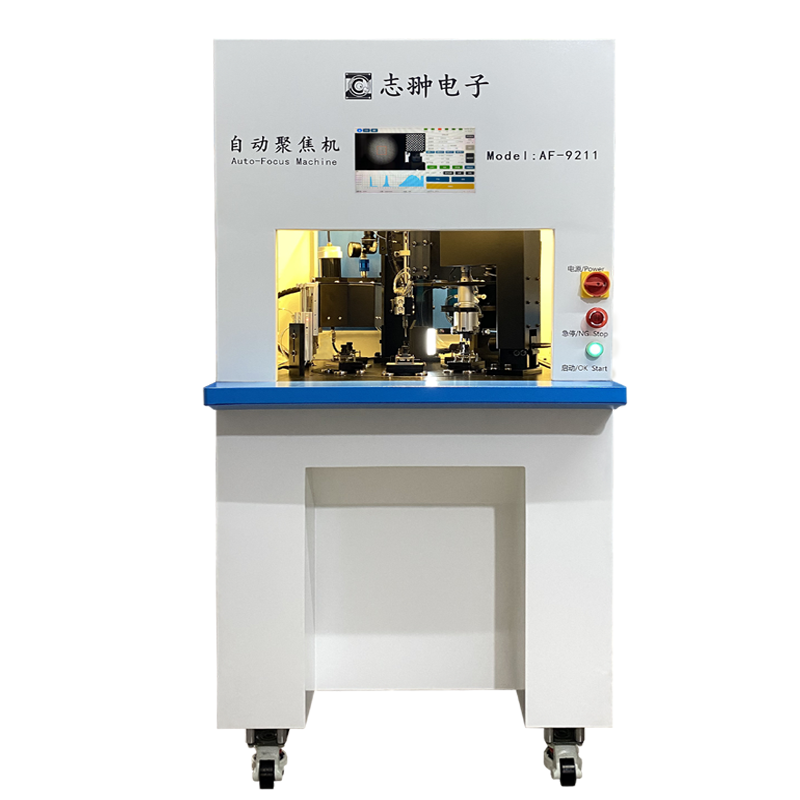
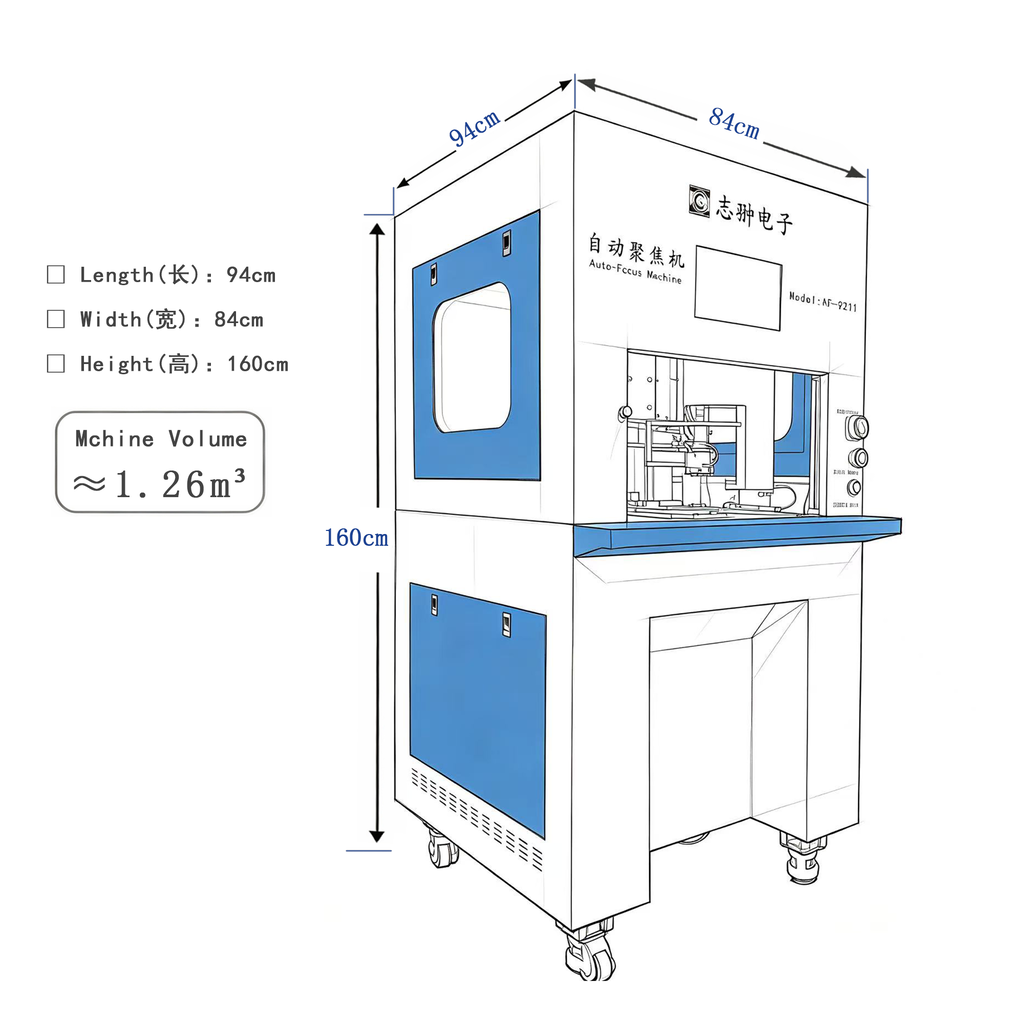
| 一、AF-9211Parameter table | |||
| No. | model | parameter | PS |
| 1 | External dimensions | 94*84*160 | CM |
| 2 | Weight | 240kg | |
| 3 | Power supply | AC220V 50Hz | |
| 4 | Power | 450W | |
| 5 | Air pressure | 4kg/c㎡ | |
| 6 | Control method | Electronic control (touch screen) | |
| 7 | time for a single product | 6S | 600 per hour |
| 8 | Motion parameters | 8000 | |
| 9 | pulse accuracy | 0.00002 | |
| 10 | Torque | 500gf*cm | |
| 11 | CCD imaging accuracy | 0.002 | |
| 12 | instrument magnification | 150 | |
| 13 | image acquisition accuracy | 1:1 | |
| 14 | gluing way | 气压 | One drop/two drops/four drops and one ring can all be set. |
| 15 | glue type | UVglue | |
| 16 | glue volume accuracy | 0.01S | |
| 17 | curing method | UV | |
| 18 | UV light type | UV点光源 | |
| 19 | UV lamp wavelength | 365nm/395nm | 365nm or 395nm |
| 20 | UV lamp power | 4000mw/c㎡ | |
| 21 | Torque requirements between lens mounts | 200-500gf*cm | |
| 22 | Complete four processes | 6-station rotary table. Completes four processes: automatic lens pre-tightening, automatic focusing, automatic dispensing, and automatic curing. | Automatic pre-tightening, automatic focusing, automatic dispensing, automatic curing, saving stations, and improving efficiency. |
二、Operating environment and precautions for the equipment
1. Operating environment:
1.1 Ambient temperature: -10°C to +55°C
1.2 Relative humidity: not exceeding 85%
1.3 The equipment needs to be used in a dust-free environment
2、2.1. Impact of IR-CUT on focusing accuracy:
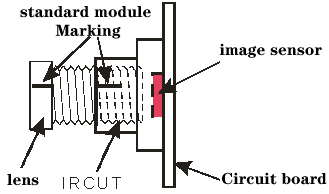
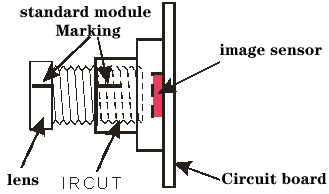
The pendulum-style IR-CUT features a dual-layer structure, where the upper and lower covers are secured together using screws. If there is even a slight (0.01mm) loosening between the upper and lower covers, or between the lens and the thread of the IR-CUT, it amounts to a rotation of 7.2° for a small lens with a thread pitch of 0.5mm (i.e., 50 threads). Using the formula for calculating arcs, [2×3.1416×7mm×(7.2÷360)]=0.88mm, a movement of 7.2° on a small lens with a diameter of 14mm translates to a displacement of 0.88mm. Given that a human hair is typically 8 threads thick, a vertical movement of the lens on the lens holder (IRCUT) by 1/8 of a human hair is equivalent to a displacement of 0.88mm on the arc of a small lens with a diameter of 14mm, which is close to 1mm!!!!!
This instrument can precisely focus and compensate, but if the IR-CUT is not accurate, moving a single wire (0.01mm) casually is equivalent to a 7.2° angular movement and a 0.88mm radial movement. The focusing and angular compensation performed by the instrument will become completely inaccurate! To achieve precise focusing accuracy when using an automatic focusing machine, customers must work on both the lens and the IRCUT materials, ensuring they are well matched!
② IR-CUT includes a daytime filter and a nighttime filter, and the optical characteristics of these two filters are different. If the focus is adjusted for the daytime filter and then switched to the nighttime filter, the focus will be inaccurate! Conversely, if the focus is adjusted for the nighttime filter and then switched to the daytime filter, the focus will also be inaccurate! When the instrument automatically focuses, the module being tested does not need to be powered on. If the IR-CUT is in the state of the nighttime filter when using the instrument for focusing, and then manually powered on during testing, the IR-CUT will switch to the daytime filter, causing the focus to be inaccurate!
三、Infinite focus and angle compensation
①This automatic focusing machine emits high-intensity parallel light, which penetrates the lens of the camera module under test and directly reaches the target surface of the imaging sensor (CCD or CMOS), and then processes the returned
The target surface image is automatically focused. According to the principle of the parallel light infinity optical system, the module under test has been adjusted to focus at infinity. The focus at infinity is suitable
Lenses of any focal length. The actual scenery viewed at infinity focus is more detailed.
② However, the security and camera industry has long relied on manual focusing and judging images of fixed distance targets, which results in a focus that is not infinitely accurate
The far focal points are not completely consistent. To address this, the instrument provides compensation values to facilitate customers in finding the corresponding compensation values based on their own modules.
③ Method for confirming compensation values:
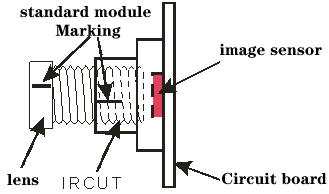
Step 1: Manually align the target to a module without blurred edges and corners, and use a blade to make a scale as shown below.
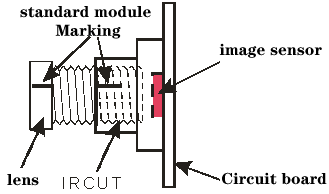
Step 2: Use this module to adjust the focus at infinity on the machine. If the scale marks align perfectly, it indicates that the focus at infinity is already correct and no compensation values are needed. If the scale marks do not align, as shown in the example below:
四、 Touchscreen interface function
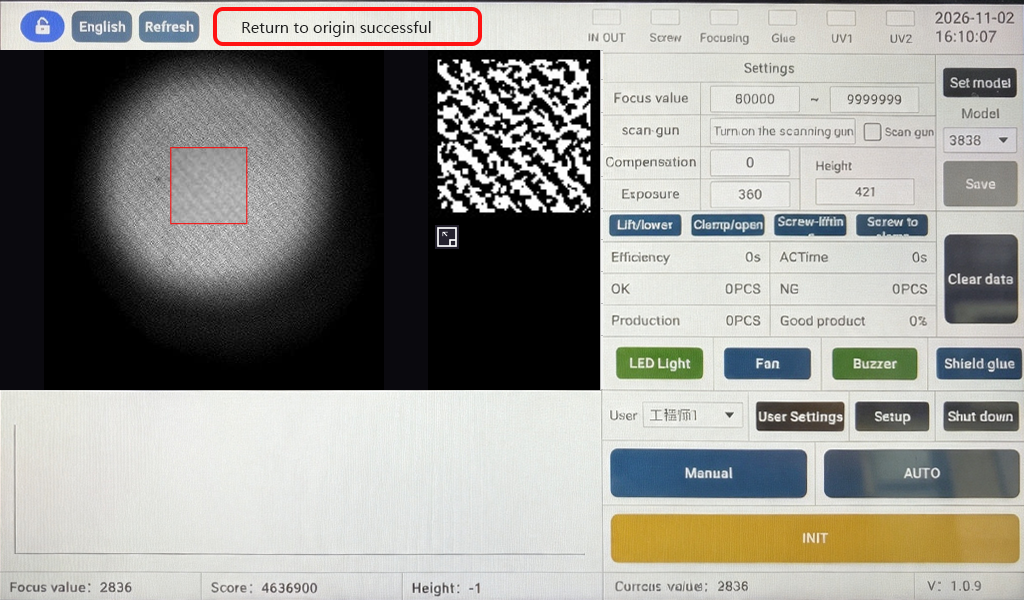
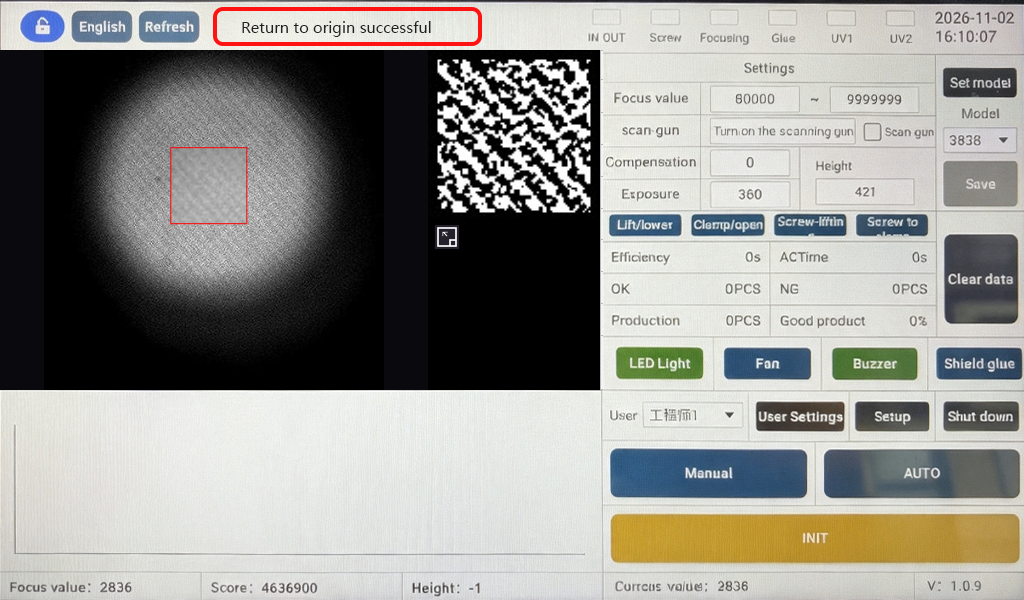
4.1. Turn on the power; the touchscreen will display the startup screen and enter the main interface. At this time, no information will be displayed in the status bar. wait patiently for 1-2 minutes, and the machine will automatically perform its first reset, and the prompt bar will display "Return to origin successful".
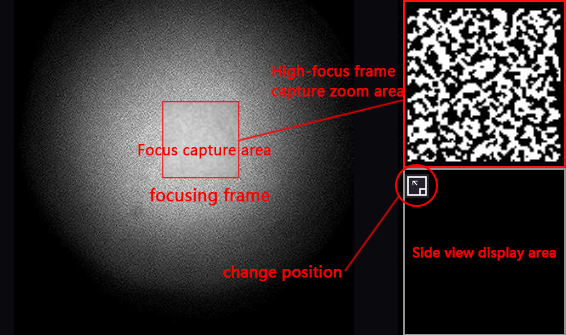
4.2Wait for the touch screen to connect to the backend successfully, and the main screen will display the camera image.
4.3Press [INIT] to return all cylinders and stations to their original positions. The initialization process must not be blocked by the light curtain, otherwise the initialization will be interrupted and be restarted.
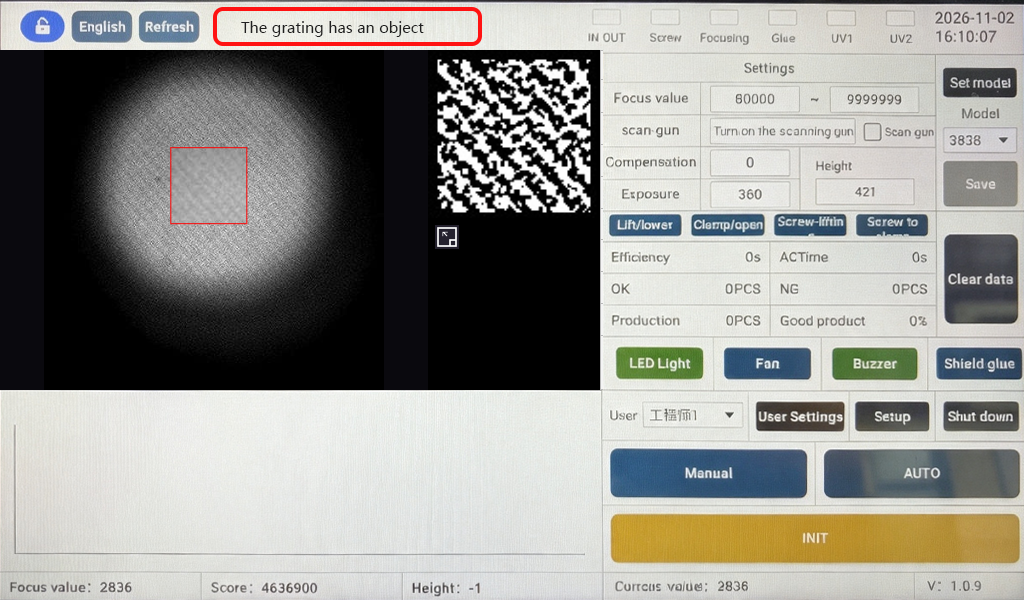
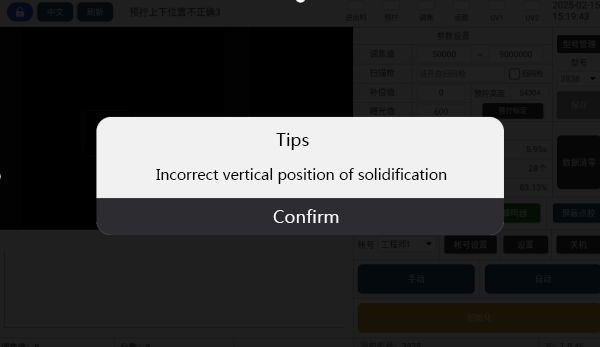
4.4If the left hand slide air valve has no air, or if the loading and unloading at each station is incorrect, the interface will display an alarm screen.
4.5After initialization, all cylinders and stations return to their original positions, and the interface displays "Return to origin successful".
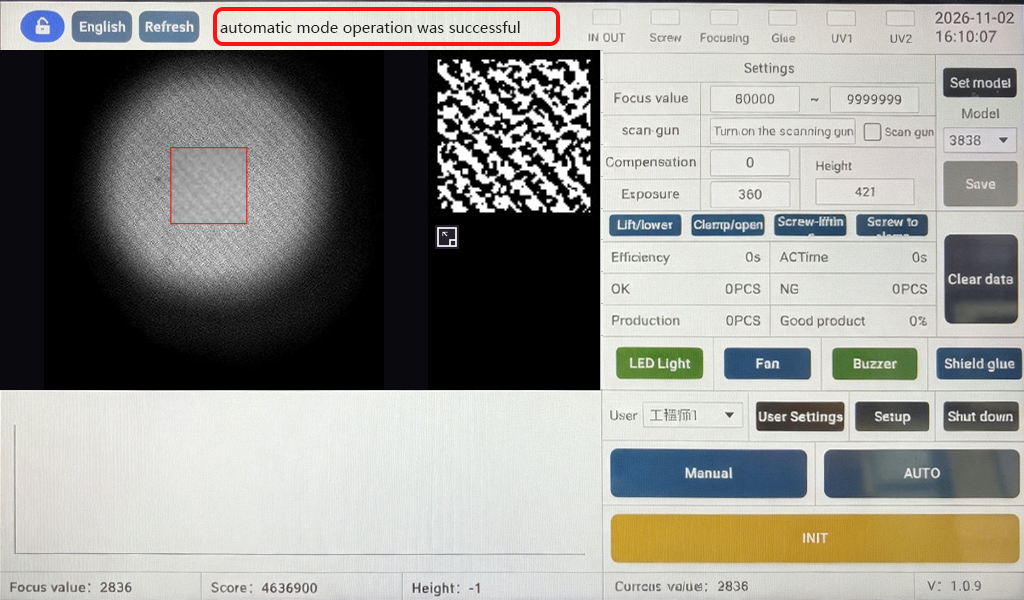
4.6Press [Auto], and the display will show that the automatic mode operation was successful.
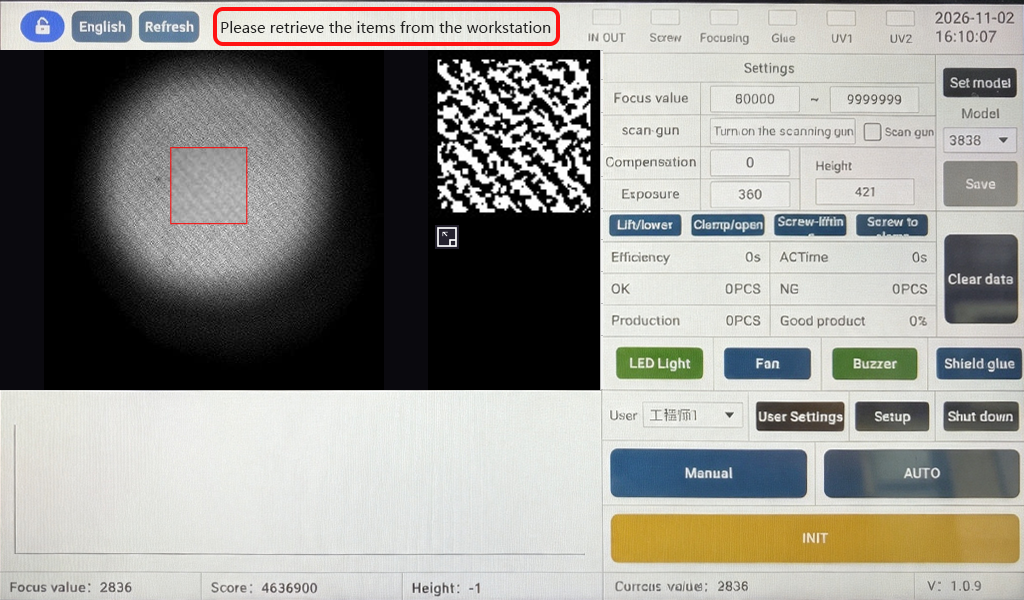
4.7Attention! There must be no materials on the [Automatic] pick-and-place station, otherwise it will display "Please remove the items from the station".
-
- It can run automatically after loading materials. When there is material at the pick-and-place station, if the green light is on, it indicates the current material is a completed OK product; after removing the current material, the green light will turn off, and loading new material will continue the automatic operation; if the red flashes, it indicates that the current material is an NG product; when the red light is on for an NG product, the buzzer will sound an alarm if the switch is on after removing the current material, the red light will turn off, and loading new material will continue the automatic operation.
-
- When material clearing is required or when running without material input, press the 【Green Button/Start】; the current station does not require material input to run.
 【Start/OK】
- When material clearing is required or when running without material input, press the 【Green Button/Start】; the current station does not require material input to run.
 【stop/NG】
-
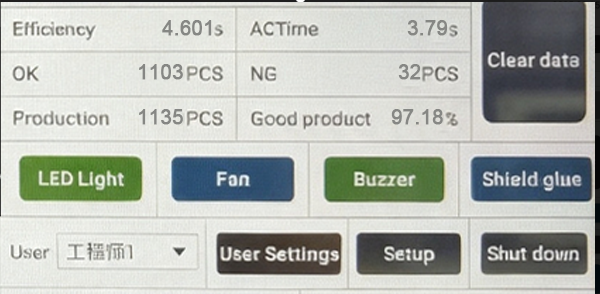
- The data statistics column (Success, Production Quantity, Failure, Yield Rate) displays the current production data in real time; this data will not disappear when the is turned off, and it can be cleared by pressing [Clear Data].
-
- The [LED light] in the interface is the switch for the lighting LED.
- the [Fan] in the interface is the fan switch.
- In the interface, the [Buzzer] is the buzzer switch when the product with a flashing red light is NG.。
- [shield glue] in the interface is used to temporarily turn the dispensing function on or off.
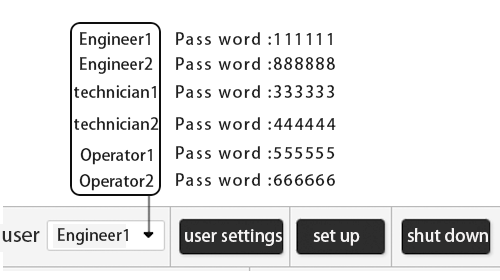
Engineer 1 and Engineer 2 can change their own passwords and the passwords of their subordinates, but cannot change the passwords of their peers.
Technicians can perform system settings, but cannot add accounts or change others' passwords.
Operators can only perform simple operations and cannot change any parameters.
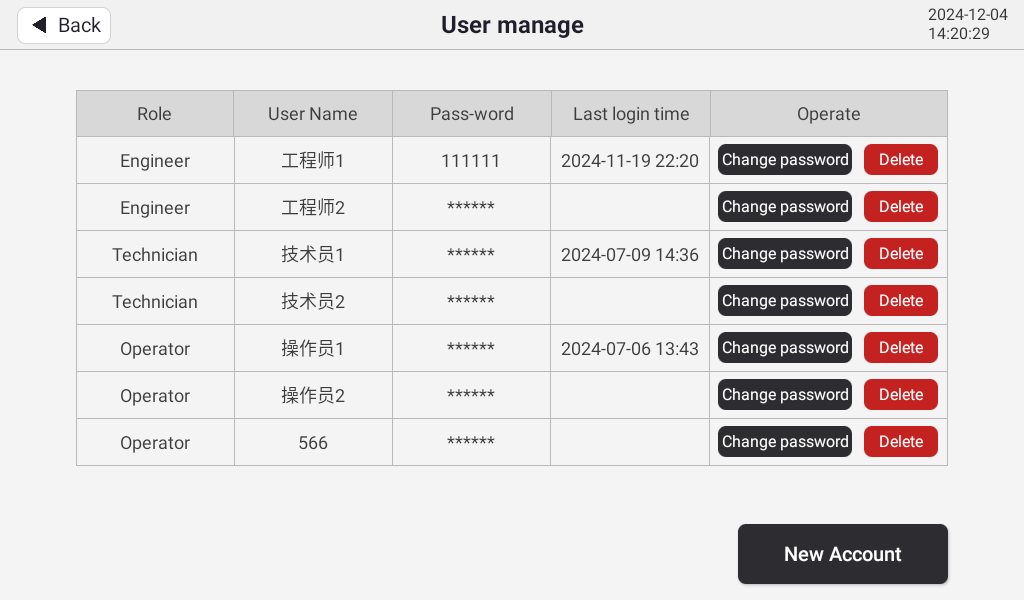
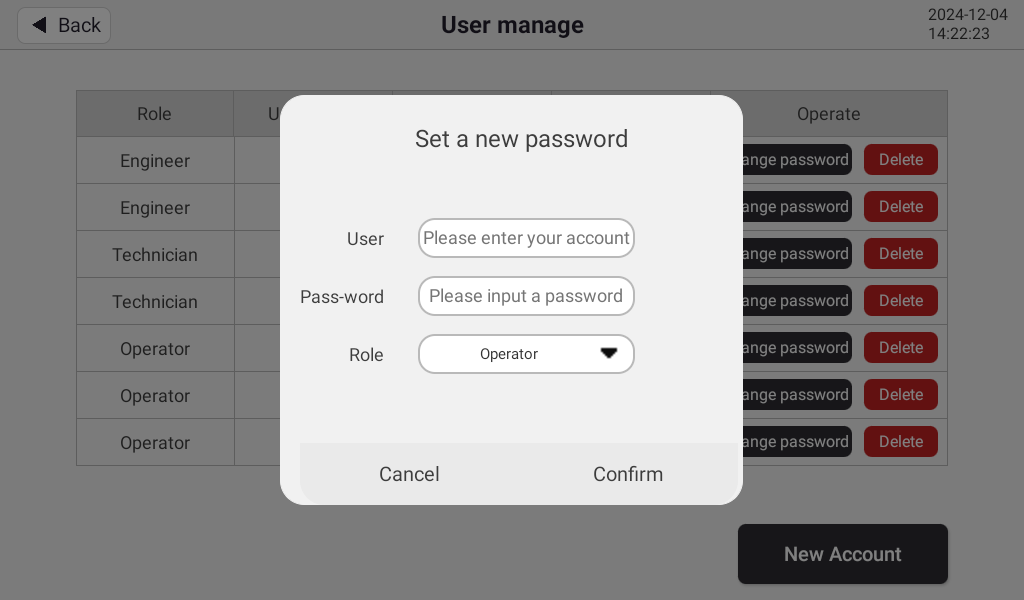
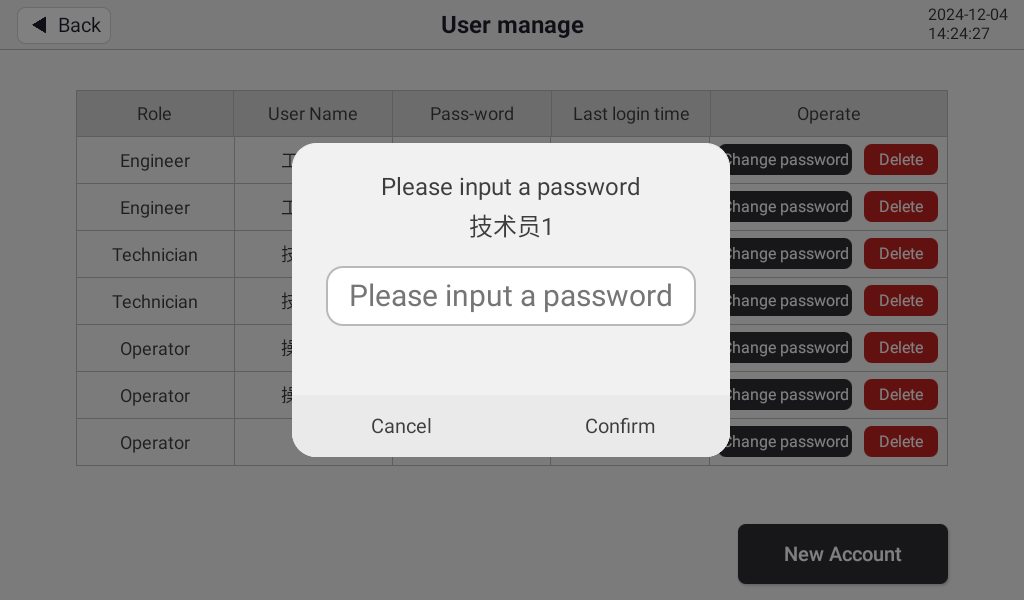
2.8, the default password for Engineer 1 is 111111, and the default password for Engineer 2 is 88888.
2.9, the default password for Technician 1 is 333333, and the default password for Technician 2 is 44444.
2.10, the default password for Operator 1 is 555555, and the default password for Operator 2 is 66666. Please keep the passwords safe and do not disclose them carelessly. Remember to back up the passwords after changing them to prevent forgetting them.
- [Settings] and enter the current account password to enter the debug mode to set the parameters for each station. Parameters can be set in both manual and automatic modes, but manual control takes effect in manual mode. If you do not have permission, a prompt will indicate that you currently do not have permission. Please log in with an account that has permission to with the operation. (Log in with an Engineer or Technician account)
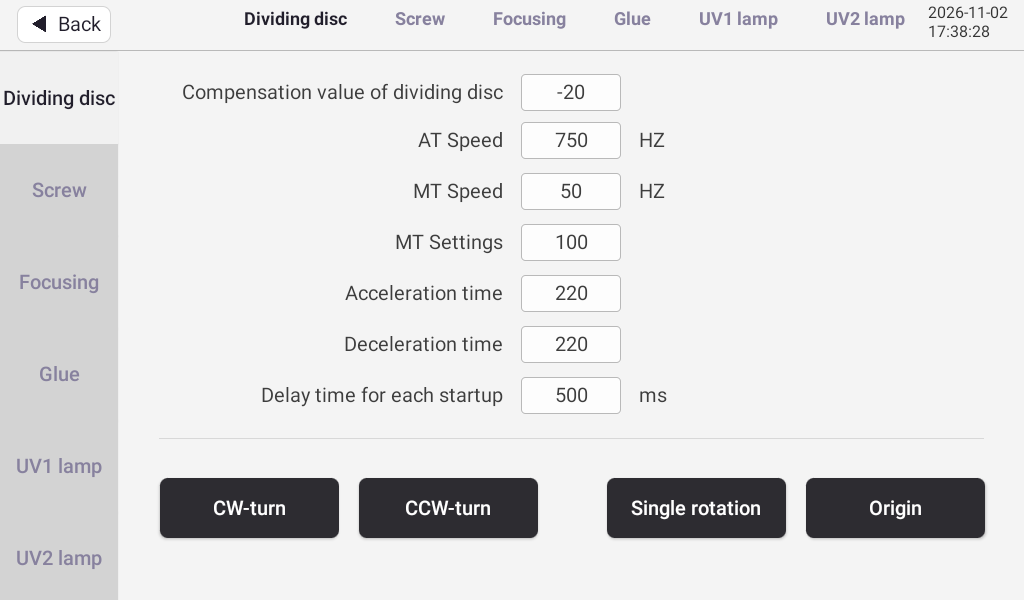
4[Turntable] Interface Operation Introduction
4.1 The parameters of the turntable are preset at the factory, and generally, there is no need to change the data Please do not change the parameters above at will. If you need to make changes, please consult the manufacturer's technical support.
4.2Introduction to Screw Interface Operations
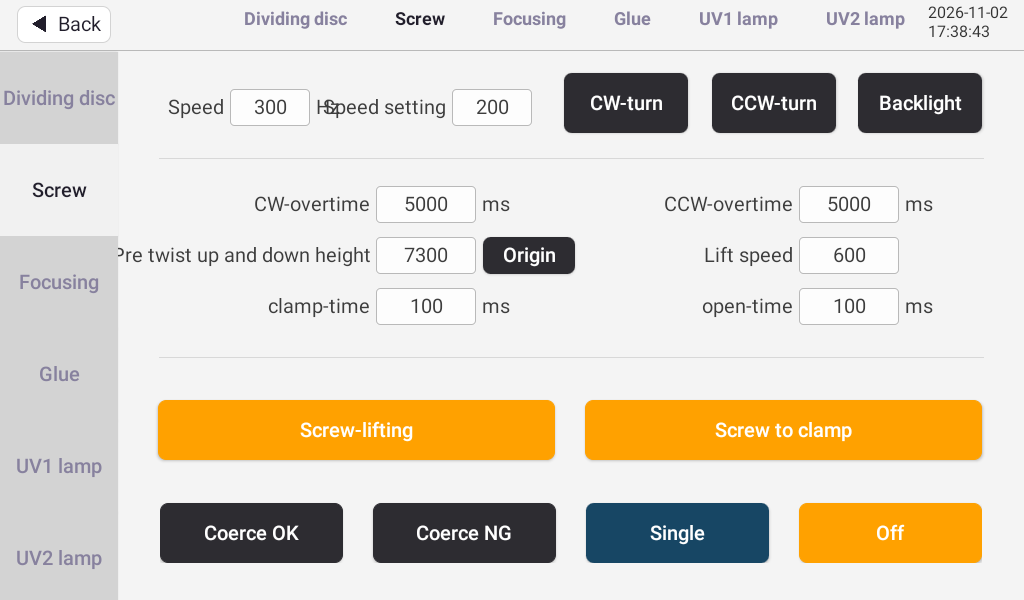
【Speed】The rotation speed of the Screw lens can be controlled.
【HSpeed】refers to the time for motor acceleration and deceleration.
【CW-overtime】It refers to the Screw station; if the height is not found within the set time, it will force a stop and trigger NG processing.
【CCW-overtime】It refers to the Screw station; if the height is not found within the set time, it will force a stop and trigger NG processing.
【Pre twist up and down height】refers to the position value of the [screw] height
【Lift speed】refers to the speed of ascending or descending
【Clamp-time】The gripper clamps tightly and proceeds to the next step when the set time is reached.
【Open-time】The gripper opens and executes the next step when the set time is reached.
-Manual single operation
【CW-TURN/CW-TURN】Control the forward and reverse rotation of the pre-tightening motor respectively in manual mode.
【Backlight】backlight switch
【Origin】Lower the module back to its original position in manual mode.
【Screw-lifting】control ascent or descent
【Screw to clamp】The pre-tightening gripper can be controlled to clamp or open.
【Coerce OK】Refers to the current pre-tightening results being all forcibly passed as OK.
【Coerce NG】Refers to the current pre-tightening result, which is forcibly NG (Not Good) and failed.
【Single】In manual mode, the current pre-tightening station executes the pre-tightening action once independently.
【Off】The current Screw station can be blocked, which is equivalent to closing the Screw station.
3.3Introduction to Interface Operations for [Focusing]
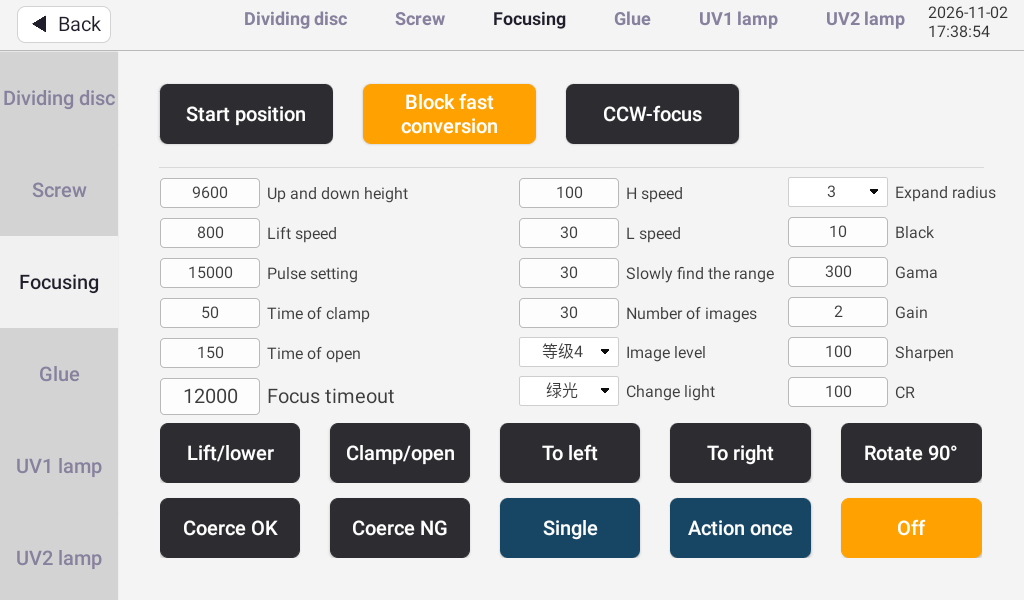
【upper and lower height】 It refers to the focusing station rising to a specified height, which can be set according to the height requirements. (We usually set a 1mm gap between the lens the vertex after rising to avoid putting pressure on the lens.)
【Lift speed】Refers to setting the speed between rising and falling.
【Pulse setting】How many pulses can the control focus rotate in a single direction at most? After rotating the default number of pulses in the default direction, if the focus is not found, it rotate in the opposite direction by twice the number of pulses to find the focus. (The number of pulses for one full rotation of the lens is 13,33.)
【Time of clamp】You can set how long after the rising edge to actuate the clamp. (Data unit is ms)
【Time of open】You can set how long to wait after focusing is complete before opening the clamp. (The data unit is ms.)
【Focus timeout】You can set the time required to complete each focusing operation, and if it exceeds this time, it will be judged as NG. (The data unit is ms)
【H speed】Refers to the initial scanning speed during focusing. The value is generally between 100 and 400.
【L speed】It refers to slowly finding the optimal value after scanning to the focus. The value is generally between 10 and 50.
【Slowly find the range】The search range needs to be expanded during scanning, generally between 15 and 40.
【Number of images】It refers to the number of visible points on the interface required to start calculating the focus score; generally, when the module is relatively clear, it can be set to 0-80, and when the module's focus is not clear enough, it should be set between 1 and 10.
【image level】When the module is clearly visible, it can be set to level 4-5; when the module focus is not clear enough, it should be set to level .
【Chenge light】Different colored light sources can be switched; some modules require color to find the focus, and the default is usually green or red.
【expend radius】The range focus captured by the interface is expanded or shrunk (shrink 3-9, expand)
【black】This value is generally the default and does not need to be changed.
【gama】When the focus sharpness is insufficient, it can be changed to 300; under normal circumstances, it is 100 or 200.
【Gain】This value is generally the default and does not need to be changed.
【sharpen】The value is generally between 0 and 200.
【CR】This value is the default and does not need to be changed. It is generally between 100 and 120.
-Manual single operation
【Lift/lower】Control the focus module to move up, and clicking again will return it to its original position.
【lamp/open】The focusing gripper can be controlled to clamp and release.
【to left/toright/rotate90°】In manual mode, control the gripper to move left, move right, or rotate 90 degrees respectively.
【coerce OK】It means that the results of the current focus adjustment are all forcibly changed to OK.
【coerce NG】Refers to the current focusing result, which is forcibly NG.
【single】In manual mode, the current focusing station executes the focusing action once independently.
【action once】In manual mode, the rotary station can be rotated once.
【OFF】The current focusing station can be masked, which is equivalent to turning off the focusing station.
3.4Introduction to the [Dispensing] Operation Interface
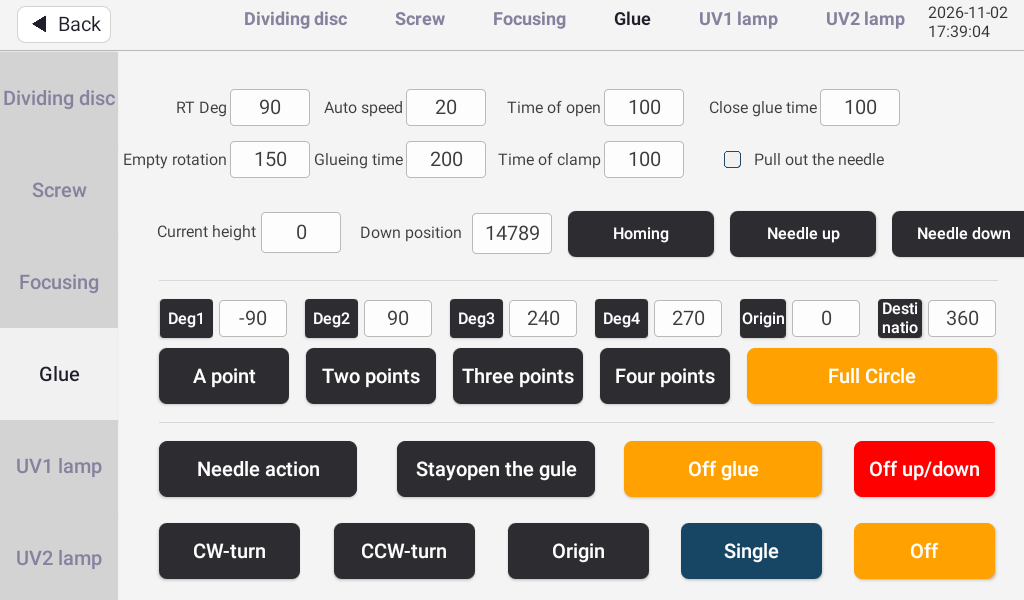
【Auto speed】The rotation speed of the needle when the dispensing mode is a circle or an arc.
【Time of open /Time of clamp】It refers to the delay time for the needle to open and close.
【Close glue time】It refers to waiting for a period of time after the system has stopped dispensing glue before moving the needle, to prevent the needle from having unflowed glue.
【Empty rotation】refers to the speed at which the pointer rotates and moves.
【Glueing time】It is the opening time of the dispensing valve, controlling the amount of glue through time.
【GCurrent height】Real-time needle height value
【Down position】The height at which the needle tip executes the action. You can go to the desired height using
【Deg1/Deg2/Deg3/Deg4/origin/Destinatio】They are the angle settings for dispensing, which can be adjusted according to the requirements.
【pull out the needle】When checked, the needle will retract before rotating; if unchecked, the needle will rotate directly without retracting.
-Manual single operation
【Homing】That is, up to the initial position.
【needle up】That is, control the needle to move upwards, used for adjustment when setting the position.
【needle down】That is, controlling the needle to move downwards, used for operation when adjusting the position.
【A point】Execute dispensing at the Deg1.
【2 points】Execute dispensing at Deg1 and Deg2.
【3points】Execute dispensing at Deg1\Deg2 and Deg3.
【4points】Execute dispensing at Deg1\Deg2 \Deg3\Deg4.
【Full Circle】Execute dispensing from the starting point to the end point; this can be set to a full 360-degree circle, or a degree less than 36, or a degree exceeding 360.
【Needle action】In manual mode, the movement of the needle in and out can be controlled.
【Stay open the glue】In manual mode, the glue can be kept on continuously. Note: Remember to turn it off.
【Off glue】The glue can be turned off separately, so that no glue flows out when the dispensing action is executed.
【Off up/down】When the dispensing needle moves up and down, it is blocked; by default, it is shown in red and does not move up and down as shown in the figure
【CW trun/CCW trun】In manual mode, the forward and reverse rotation of the needle can be controlled separately.
【Origin】In manual mode, the needle can be returned to the home position.
【single】In manual mode, the current dispensing station can be controlled to execute a single dispensing action.
【Off】You can turn off the current dispensing station to make it do nothing.
3.5Introduction[UV1lamp/UV2lamp] to the operation interface
Setting up is same UV1lamp/UV2lamp
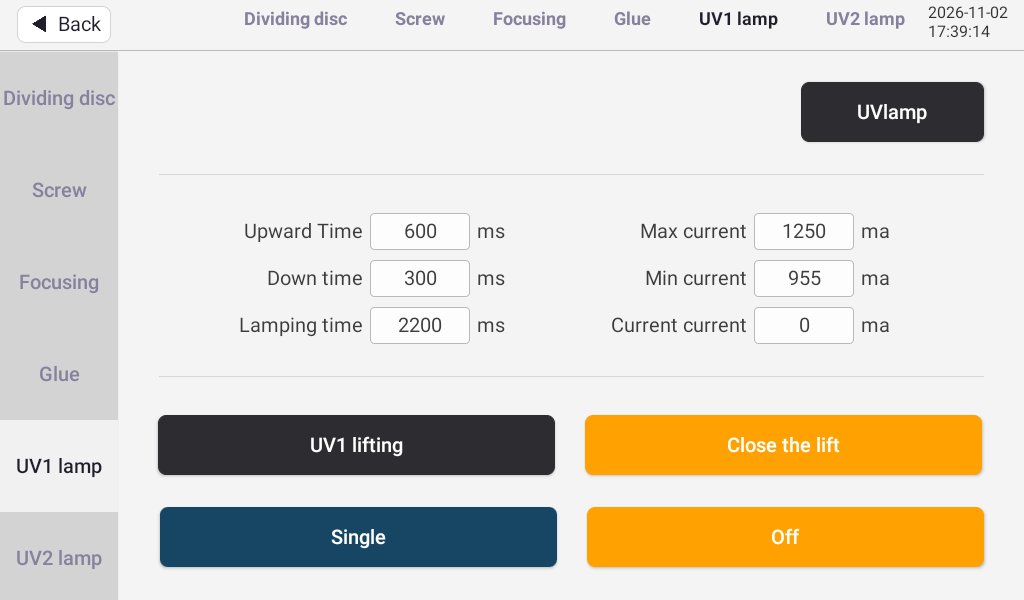
【UV lamp】Manually turn the selected UV lamp on or off. It is off by default.
【Upward time】Refers to the rise time delay of the UV lamp (unit in milliseconds)
【Down time】Refers to the response time of the UV lamp falling delay (unit in milliseconds)
【Lamping time】Refers to the automatic curing time of the UV lamp. (unit in milliseconds)Generally between 3000 and 6000.
【Max current】Refers to the maximum control value of the UV lamp current.
【Min current】efers to the minimum control value of the UV lamp current
【current】refers to the current value of the UV lamp.
-手动单次操作
【UV lifting】Can be manually operated to rise or fall in a single step.
【Close the lift】Refers to shielding the top and bottom of the UV lamp.
【single】Execute a single action in manual mode.
【Off】Refers to independently turning off the current UV1 curing station. If selected, it will not be used.
Clicking the back button in the top left corner on any page in debug mode will return you to the home page. (Various parameters set in debug mode will be saved in the parameters of the current model when exiting debug mode and returning to the home page.)
六、Setting method for the new model module
6.1Find two to three modules and adjust them manually, and make vertical scales on the lens and lens mount. Refer to (III. Infinity Focus and Angle Compensation).
6.2On the touchscreen, go to the main interface and log in with an account that has the corresponding permissions, then press [Model Management] in manual mode to enter the model interface.
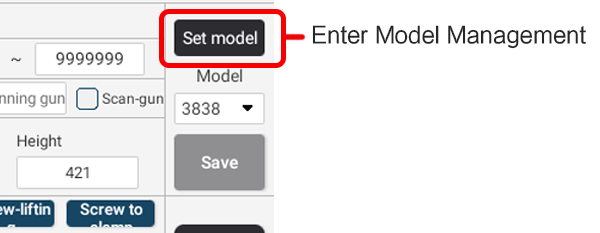
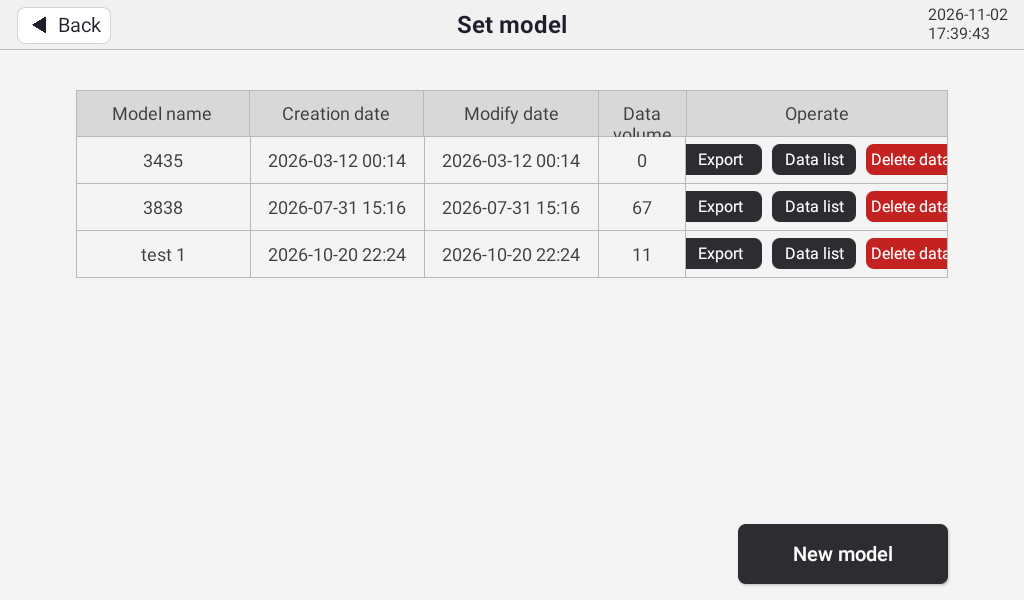
In the newly popped-up window, enter the name of the new model. The system will automatically copy all parameters the previous model being worked on. After entering the correct model name, click OK.
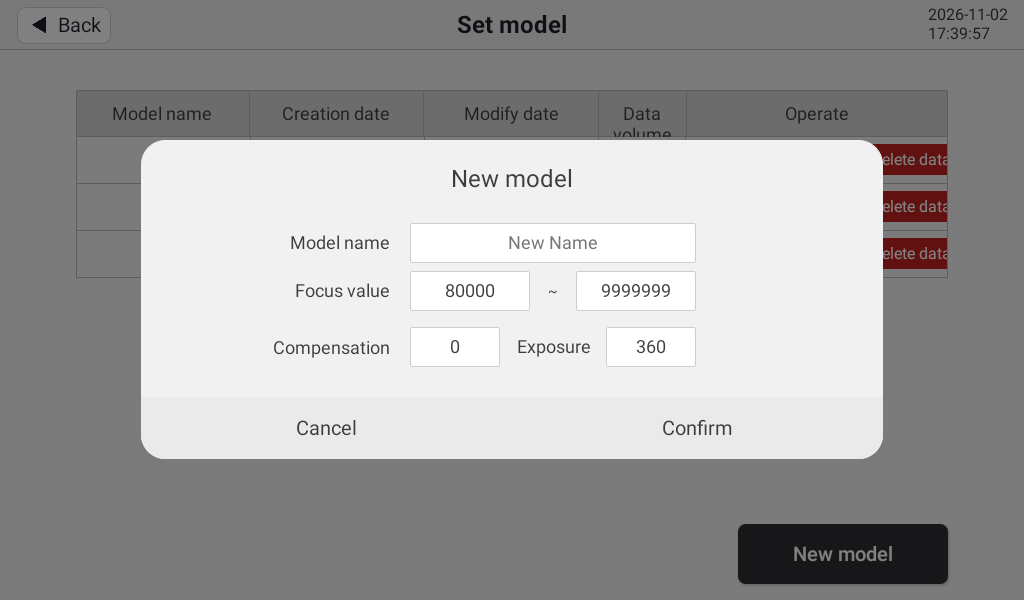
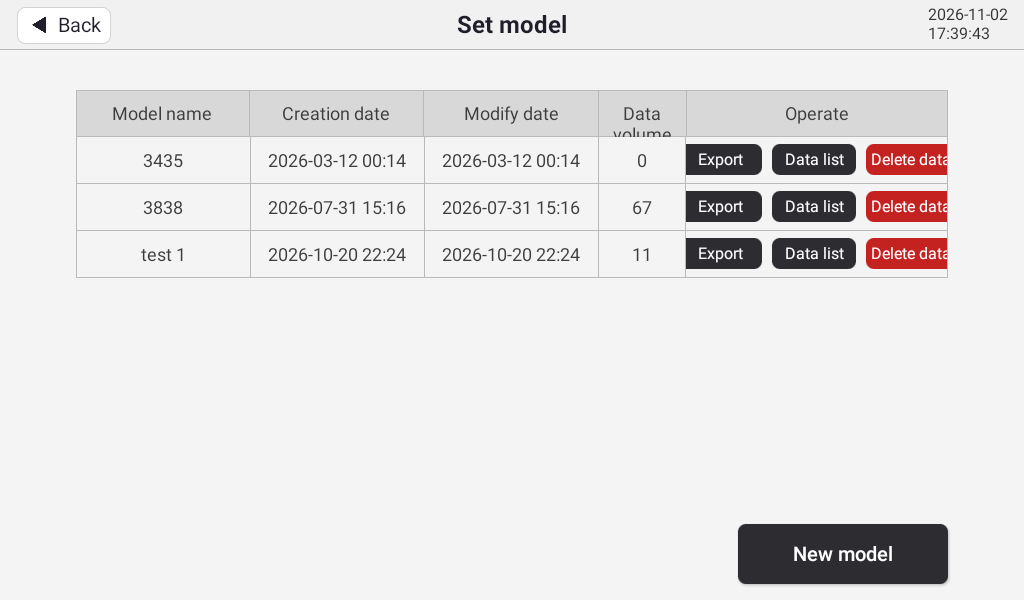
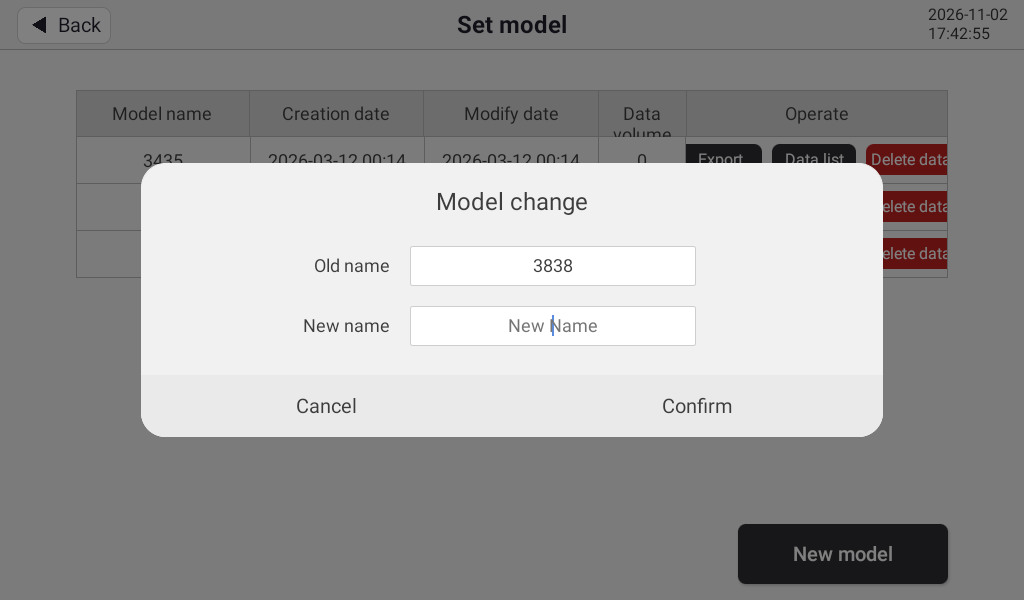
6.3Return to the main interface, select the newly created model under the model down arrow, click OK to switch to the newly created model, and change the parameters in the newly created.
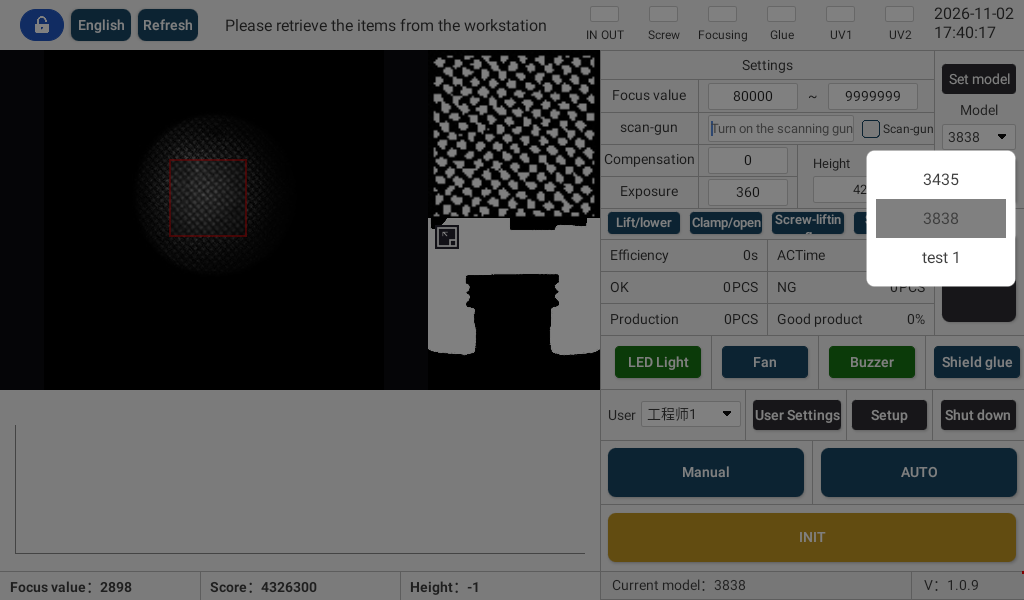
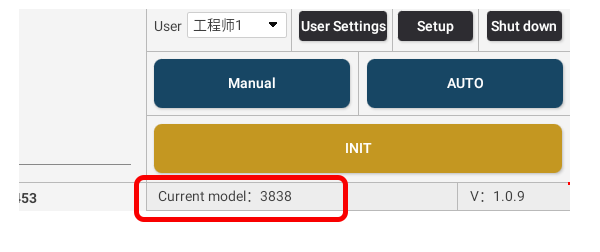
[Pre-tightening station sample setting]
6.4After focusing the sample module, rotate the lens counterclockwise by ≤100° to ≥180°.
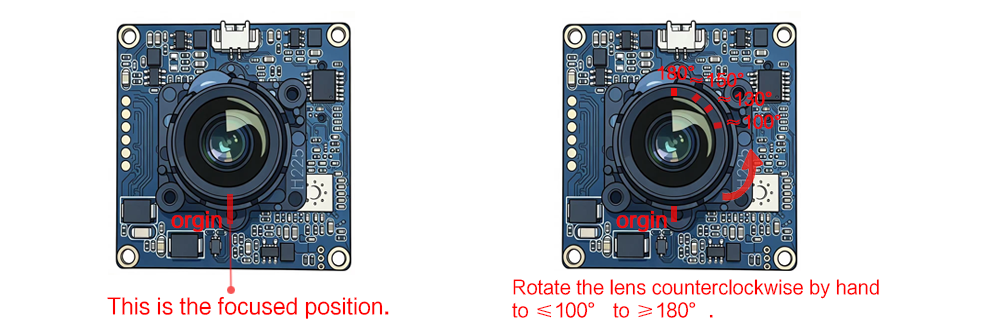
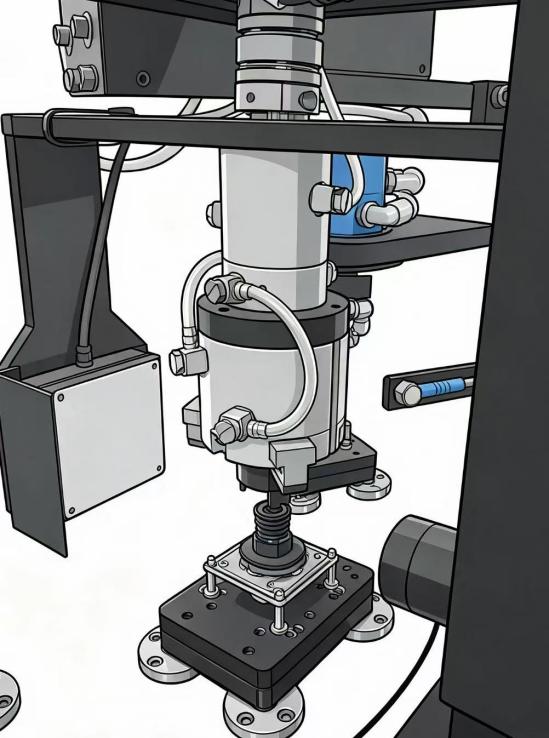
Reference case
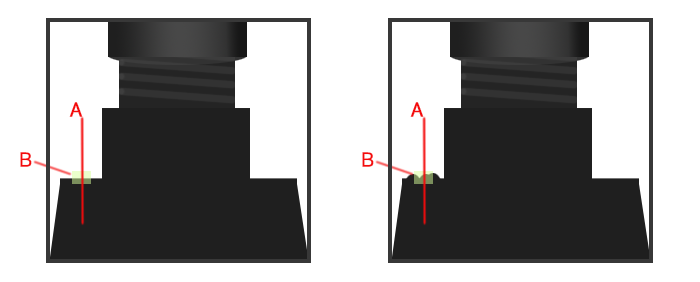
Correct case Error case
B is: Flatness range on both sides of the red line
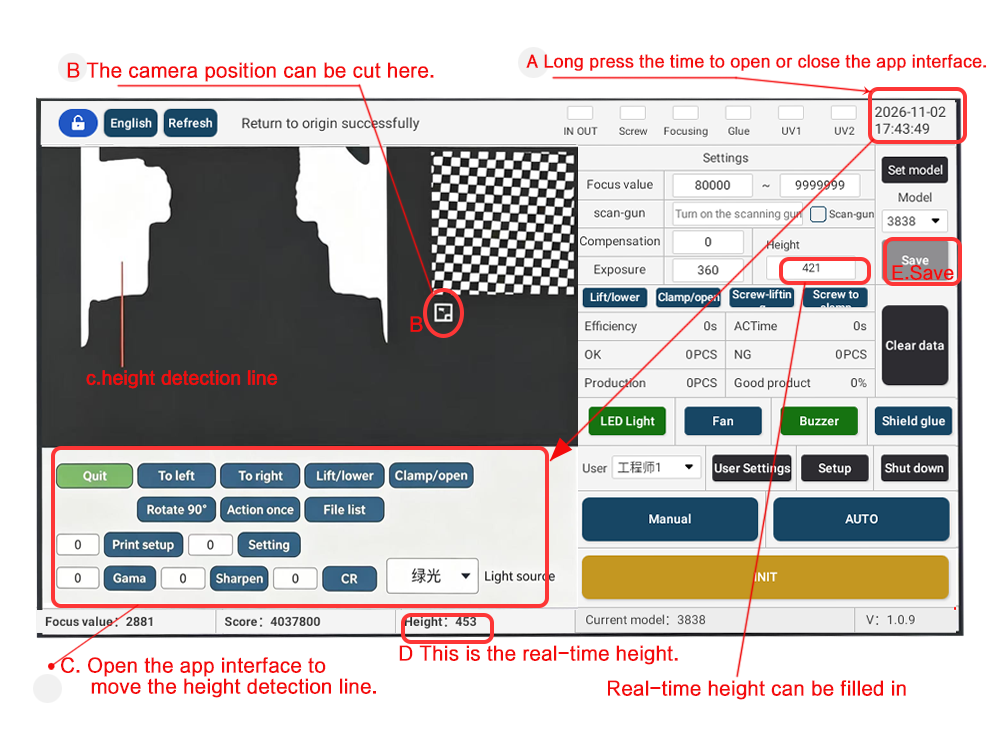
If there is no suitable flatness range in the case here, you manually move the red line to find a suitable position by opening the application interface.。
Clicking the top 【Pre-tighten】 in the upper right corner will automatically trigger a single pre-tightening operation.
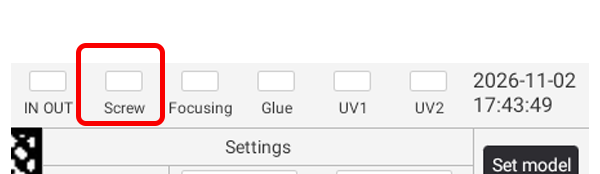
Take out the module and reconfirm whether it is screw to the required position.
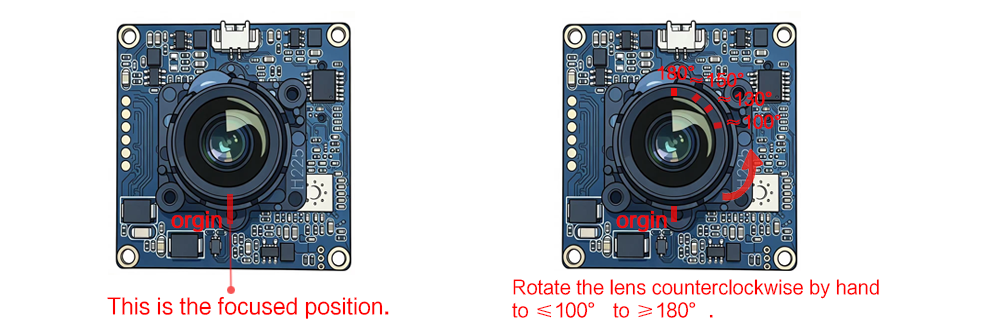
--------------------------------------------------------------------------------------------
[Focusing Station Sample Setup]
6.5Manually adjust a module, then click 【Focus】 in the upper right corner to automatically perform a single focus adjustment.
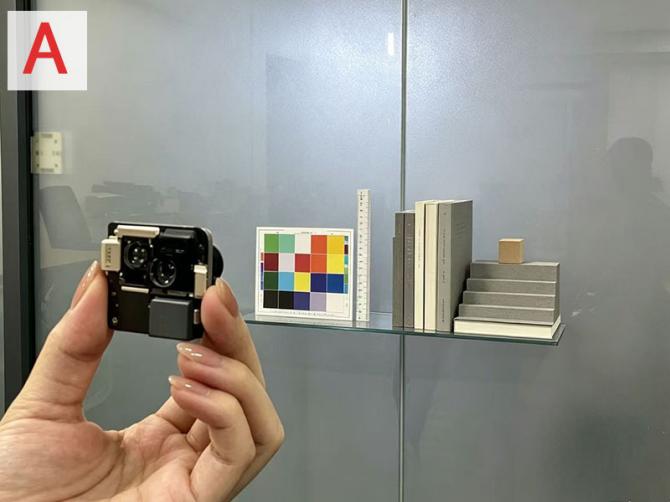
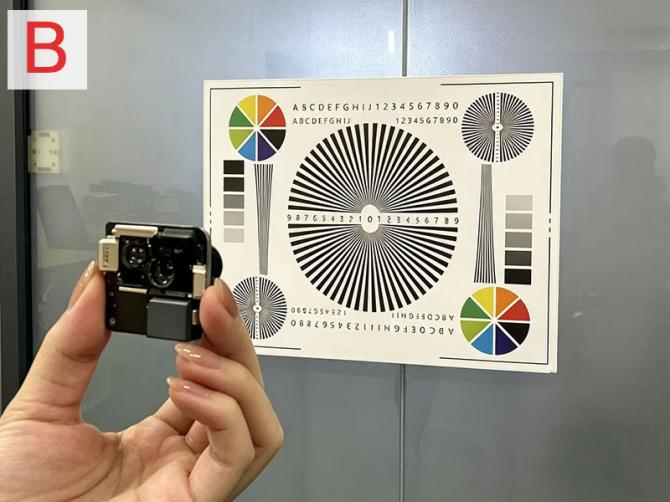
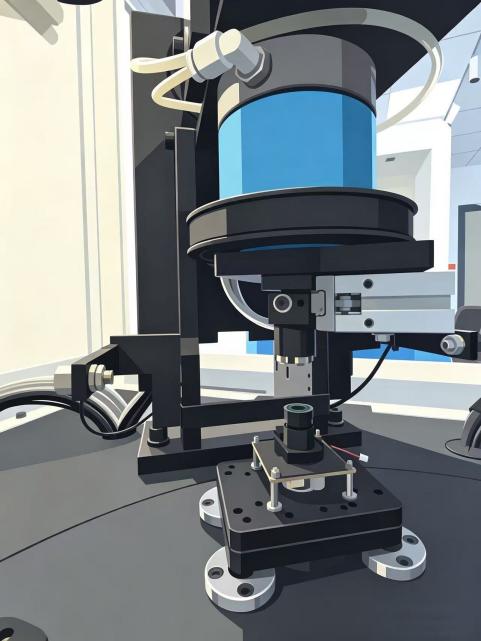 Place it on the focusing station.
Observe whether the interface shows the focus.
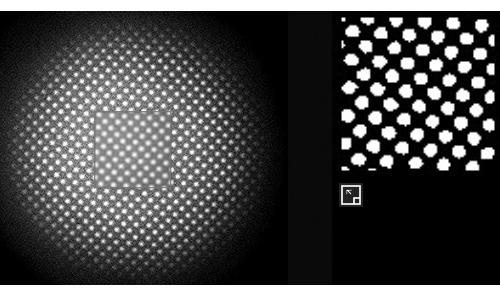
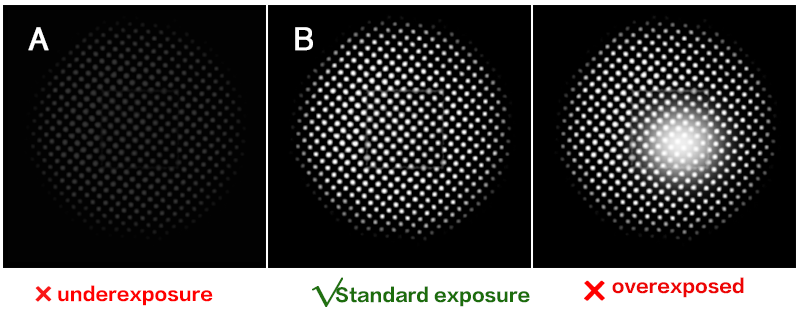
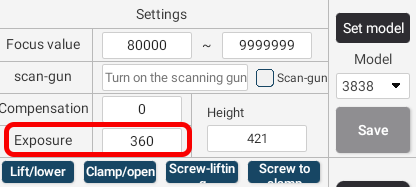
6.6If the camera image is too dark or too bright, you can adjust the corresponding exposure value to change the brightness of the camera.
-------------
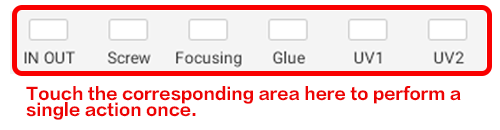
After completing this step, you can perform a screw once, and then execute the focusing to confirm whether the focus can be found normally.
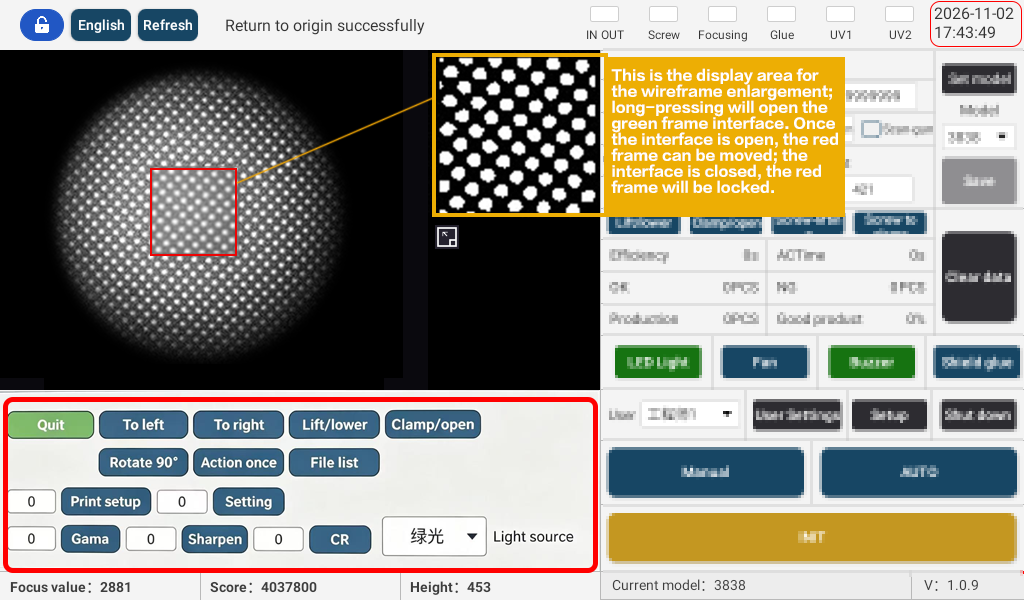
6.7Long press the time in the upper right corner to open the hidden menu; hold the red box to move the locally zoomed-in detection area.
When the hidden menu closed, the detection red box cannot be moved.
6.8If there is a difference between the position found by auto-focus and the position found manually, compensation is required!
If there is a difference, enter the corresponding value the compensation field, and after focusing, increase the compensation angle according to your value.
Reference (III. Infinity Focus and Angle Compensation)
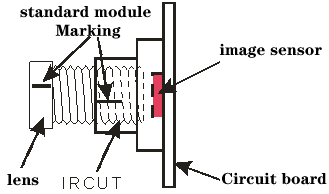
If the lens needs to be rotated clockwise to fill in a negative value, fine-tune the value based on the actual situation. Click [Focus] in the top status, and the system will automatically execute a focusing process.
Repeat the above 6.8 to make the system adjustment position overlap with the manual adjustment position.
Fine-tune the value size according to the actual situation. Once settings are complete, click the save button to pass the current parameters into the current model.
(All parameter settings on the homepage take effect immediately, but will not be saved the model; you must click the save button to save them. In debug mode, various parameter settings will be automatically saved in the current model's parameters when exiting debug mode returning to the homepage.)
6.9Refer to 2.1-2.6 for initialization and perform automatic operations.
About: Focusing station, need to set the gap range between the lens and the top surface when it rises.
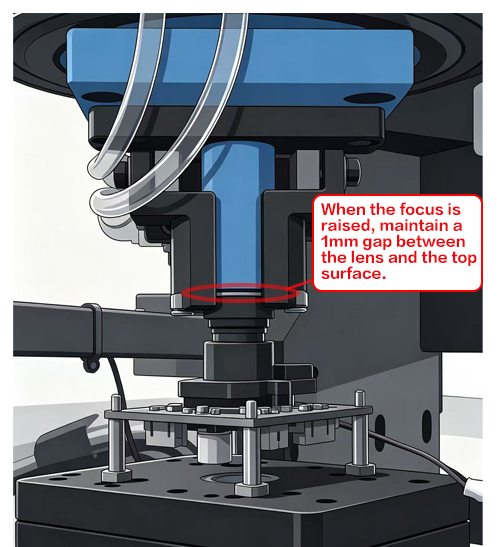
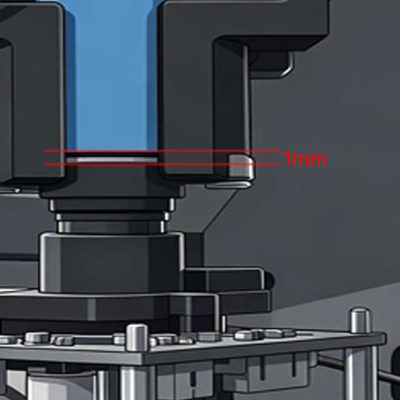
② In the focus setting interface, [Up/Down Height] be used to change the value to adjust the height position.
③ Remember to save on the home screen after making changes.
七、[Dispensing Station Sample Setup]
7.1Place the module on the dispensing station.
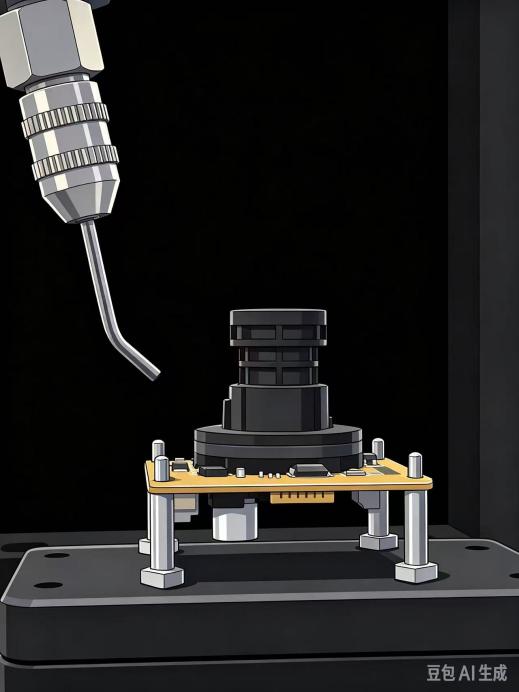
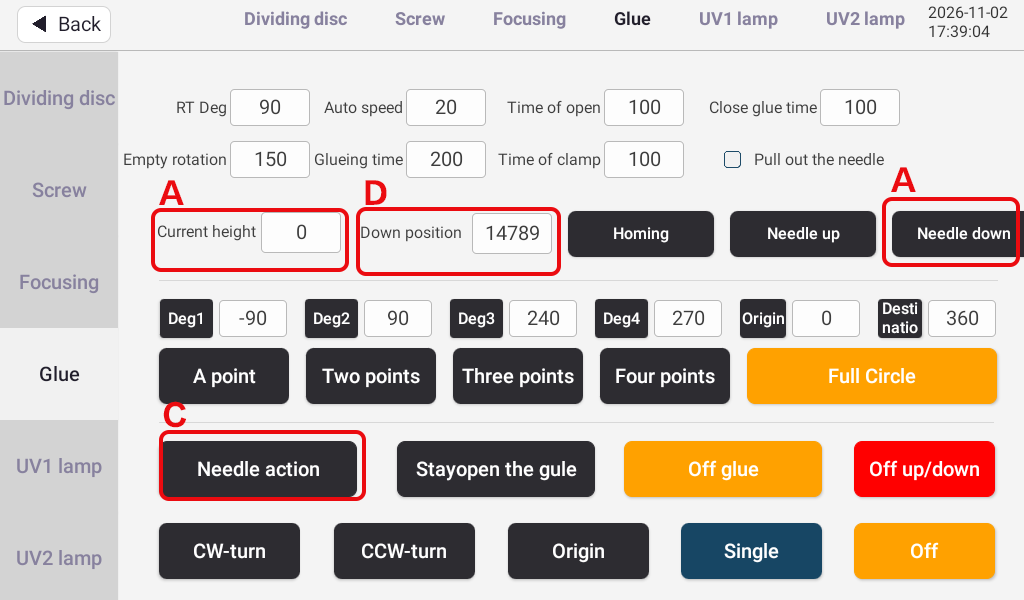
A represents the real-time height value.
B is the command to move the needle downwards; each long press moves it down by a limit of 400 units, and this operation can be stacked multiple times.
C is the command to advance the needle to the dispensing position or retract it from the dispensing position. D is field where the required dispensing height value can be entered, which can be determined based on the real-time height value. (After saving, dispensing will be performed according to height.)
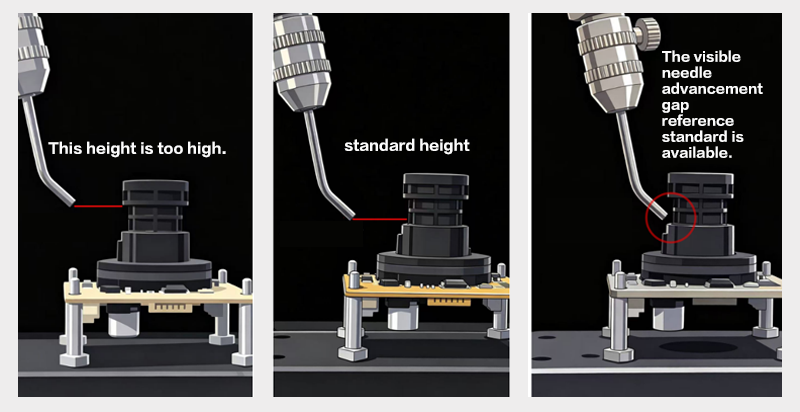
1 2 3
Based on Figure 1, Figure 2, and Figure 3, the dispensing parameters can be determined and imitated.
Based on Figure 1, Figure 2, and Figure 3, the dispensing parameters can be determined and imitated.
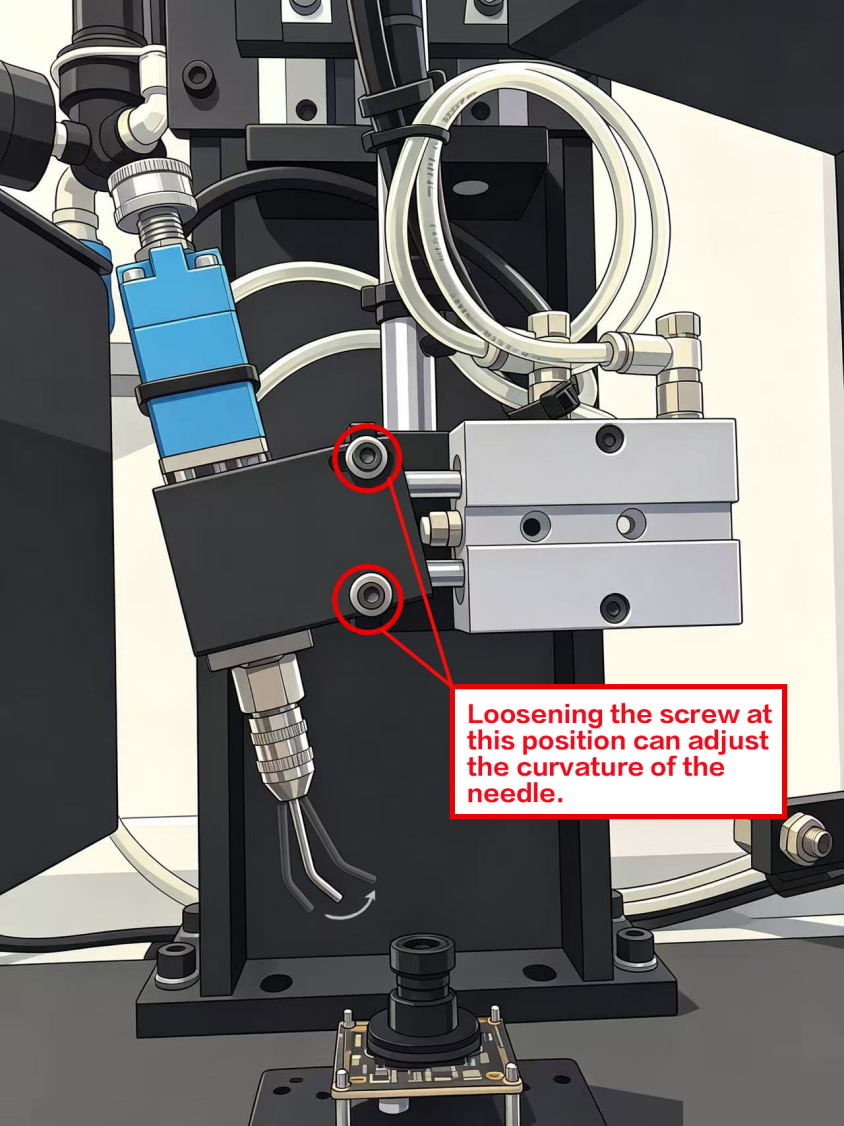
First, loosen the two adjustment screws slightly, then you can rotate the needle to adjust the opening degree; after adjusting it to the proper, tighten the two adjustment screws again.
7.3 Addition of UV glue
First pull the air valve down to turn off the air pressure. Then rotate the threads of the glue bucket lid counterclockwise to loosen it, and unscrew the lid. the glue into the bucket, rotate the lid clockwise to tighten it, then push the air valve up to turn on the air pressure.
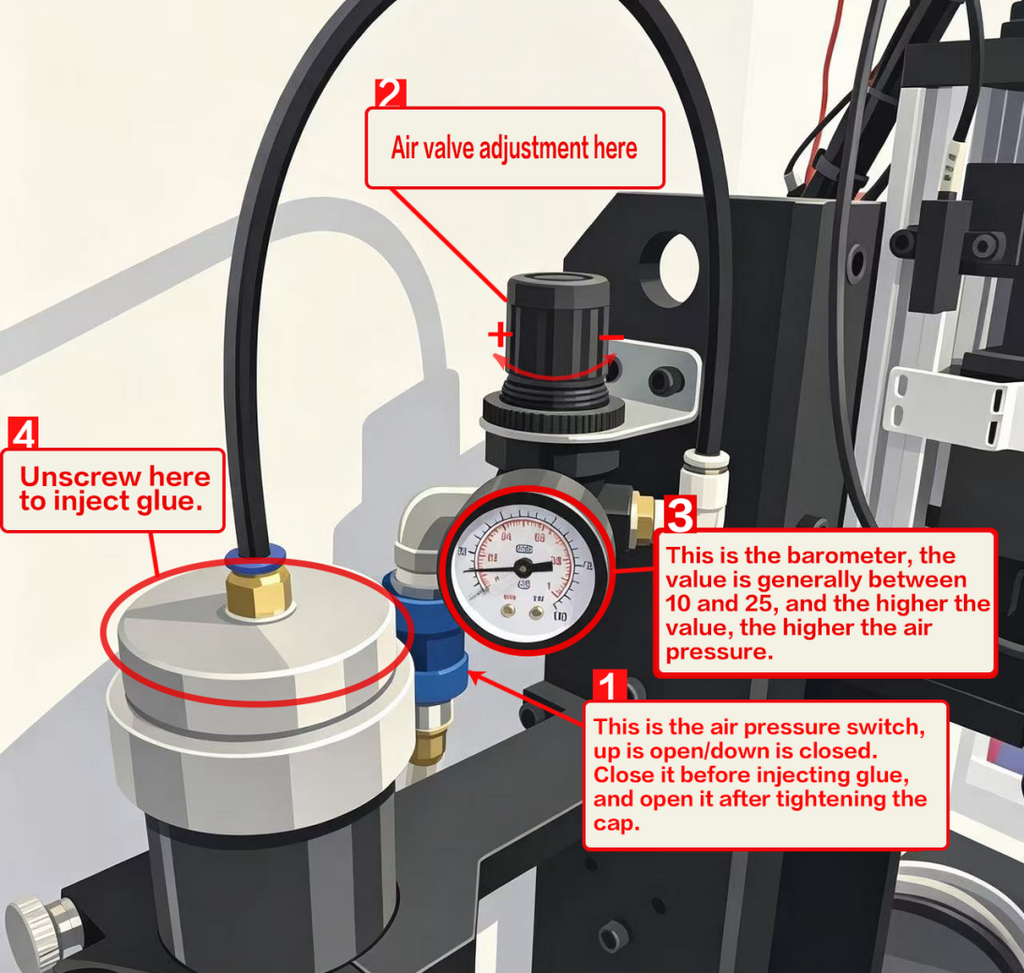
- [UV Lamp Station Setup]
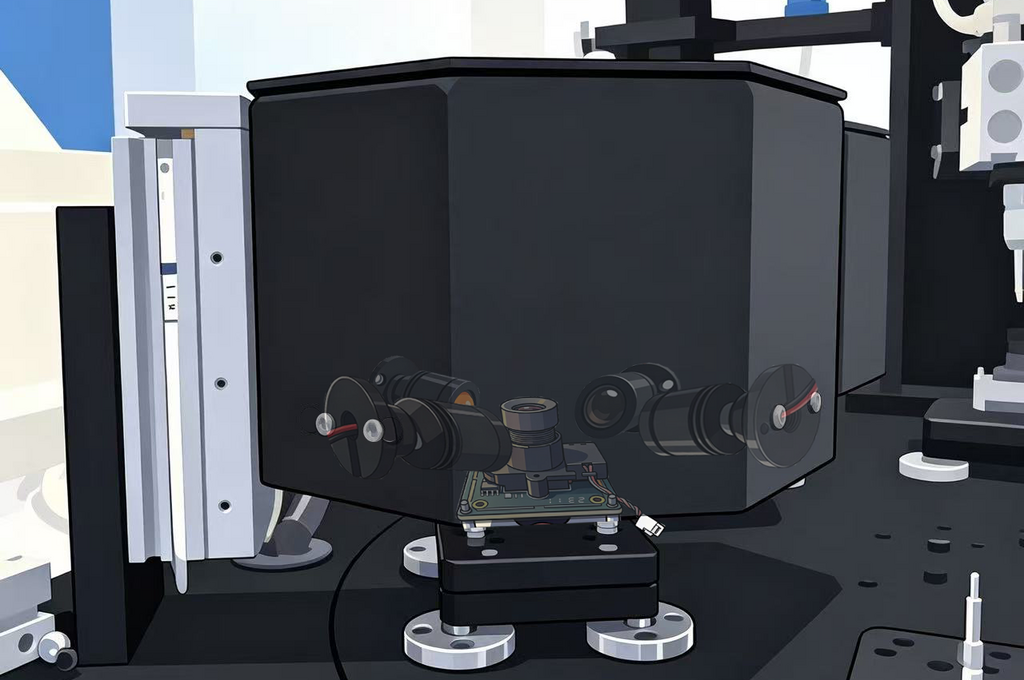
8.3 The UV light exposure time is between 4000 and 6000 milliseconds. It varies depending on the glue, and some special glues may require longer exposure time.
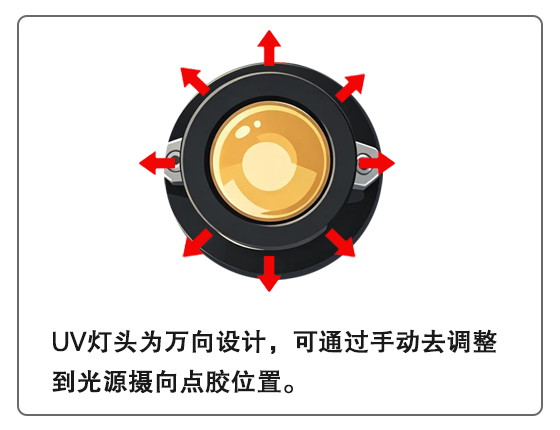
The above is the operating instructions for the AF-9211 machine.
-END-

-END-
Visit the website to learn more about the products.
http://www.zc-elec-equip.com/
http://www.zc-elec-equip.com/
Copyright © 深圳市志翀电子科技有限公司
www.zc-elec-equip.com
手机:15815544490 深圳市宝安区沙井街道衙边第一工业区A1栋二层
自动聚焦机,自动调焦机,自动对焦机,,安防摄像头自动调焦机,自动清洁组装机,全自动清洁组装调焦机,自动聚焦机AF-9118,自动调焦机AF-9119,无线IRCUT
本站部分图文来源网络,如有侵权问题请通知我们处理!
建网站维护
- 在线服务
-


